
Click Add Leases from the top navigation bar and choose one of the following:
- Manual Entry to enter the lease details using the step-by-step workflow
- Create from file to use AI Lease Abstraction
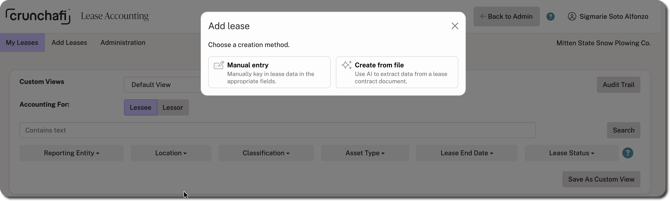
Continue below for the manual entry steps.
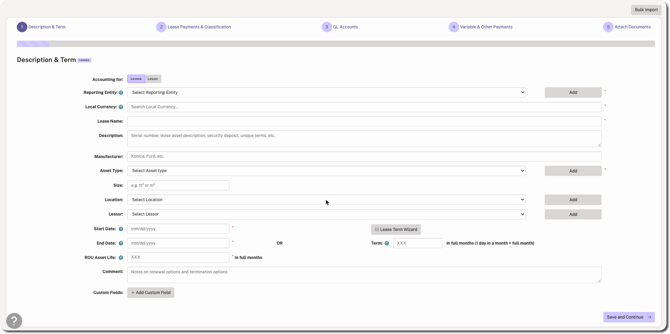
Step 1: Description & Term
Fill in the details (including adding any custom fields) and click Save and Continue. The following are minimum required fields:
- Accounting for: Select Lessee
- Reporting Entity
- Local Currency (defaults based on selected Reporting Entity)
- Lease Name
- Asset Type
- Start Date and End Date
- Lease Term
- ROU Asset Life
Optionally, you can use the Lease Term Wizard to help walk through early termination and renewal options.
NOTE
If expected options are not displayed for the following fields, certain user roles can click Add to the right of the field to add it during this step: Reporting Entity, Asset Type, Location, and Lessor.
Step 2: Lease Payments
Fill in Discount Rate, along with Incentives Received and Initial Direct Costs (if applicable). Next, select payment frequency, payment amount, number of payments and payment start dates. To add payment escalations, click Add to enter additional payment rows. If entering a transition lease where the start date equals the initial application date of the Reporting Entity, enter Existing Balances. Click Save and Continue in the bottom-right corner.
Step 3: GL Accounts
Enter GL Accounts and Cost Center allocations.
The accounts default based on the selected Reporting Entity. If there is only one account available, it will be selected by default. Click Save and Continue.
Step 4: Variable Expenses & Other Payments
This step is optional but is used to enter variable type expenses or other non-lease payments to help organizations easily populate disclosures in preparation for filing. For more information on what may qualify, go to our guidance documentation and choose the relevant standard (i.e., FASB ASC 842, IFRS 16, or FRS 102). For GASB, click here.
Step 5: Attach Documents
Click Upload, find/select the file, and click Open. You can add a name to the lease file (optional).
Click Finish in the bottom-right corner if you are done adding details, or use the Prev button in the bottom-left corner to edit details in other steps.

Step 6: Review (Optional)
If the Review + Approval policy is selected under Administration > Policies, the final step is to Submit for Review. Optionally, a Reviewer can be notified via email that a lease is ready for review.
What's Next
If you finished all the sections of the lease, it appears with a Complete status on the My Leases page. For organisations with the Review + Approval policy enabled, leases awaiting approval are in Review status.
If you exit the lease without completing all the sections, it appears with an Incomplete status on the My Leases page. Click on the ⋮ (more) option to the left of the lease name and select Continue.
