
When you log into Crunchafi Lease Accounting, you will land on the My Leases page by default. Once leases have been created, they are displayed here as a list view with various columns of information ranging from Lease Name to Modified Date.
My Leases Page
NOTE
If you are a firm user with access to multiple client accounts, you must first select a client account from the list. Click here for more information about using Crunchafi Lease Accounting as a firm
You can do the following from this view:
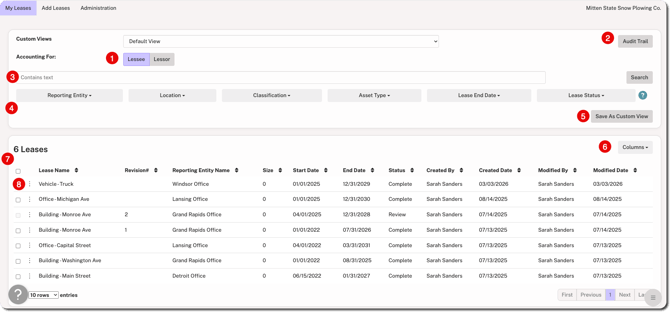
- If applicable, switch between Lessee and Lessor list views.
- Click Audit Trail to view activity on leases across users, including previous and updated values for fields that were updated and the associated lease names.
- Narrow the list by entering keywords and pressing enter/return or clicking Search.
- Filter the list by various criteria such as reporting entity, asset type, and lease status.
- Click Save As Custom View to store the filtered view for future use.
- Click Columns to hide or add columns of information. Leaving or refreshing the page restores default columns.
- Select multiple or all leases for report generation. Reports can only be run on leases in Complete status. See below for more details.
- Click the ⋮ (more) option to take other actions, such as editing an existing lease, continuing an incomplete lease, or cloning a lease. Click on a row to view lease details.
Reporting
Crunchafi Lease Accounting offers Journal Entries, Amortization Schedules, and Footnote Disclosures for one or many leases. To run reports in the local currency for leases, follow the steps below or check out our walk-throughs below.
1. Select all or select specific boxes for relevant leases on the My Leases page (required).
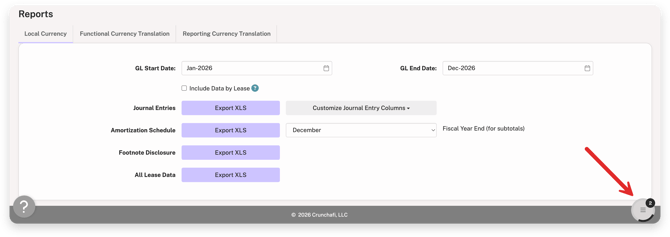
2. Scroll down to the Reports section and select your GL Start Date and End Date (required).
3. Do the following (if applicable for multiple reports):
- Select the Include Data by Lease box to view lease by data instead of a combined summary (only applies to Journal Entries and Amortization Schedule reports).
- To customize the Journal Entries, drag and drop the fields in the dropdown menu.
- Update or confirm the year end month next to Amortization Schedule to accurately report subtotals.
- If your lease portfolio includes leases under more than one standard, choose the relevant standard to the right of the Footnote Disclosure option.
4. Click Export XLS for each report you are downloading.
The reports automatically download to your computer, but you can also see reports you have run in the past 45 days by clicking the Reports Center icon located in the bottom-right corner of the screen. The Report Center does not show reports run by other users from your organization.
To export reports:
TOURIAL_EMBED_HERE
To view report details:
TOURIAL_EMBED_HERE_2